
| Introduction | - What is it? |
| Installation | - Where do I put it? |
| Usage | - How do I use it? |
| Examples | - No, really, how do I use it? |
| Known Bugs and Limitations | - What's wrong with it? |
| Contact Happy Digital | - Where do I complain? |
HD Caustics is a Shader Plug-in for LightWave that lets you add very cool shadows, and realistic transparency and fresnel effects to your shiny and transparent objects. HD Caustics is not real caustics. It uses COWSTICs, developed right here at Happy Digital.
Key features:LightWave 5.6 users: Copy the file "HD_Caustics.p" from the "hd_cowstics56" directory into your Newtek/Layout/Plugins directory.
Now, fire up Layout. Open the Options panel. Click on the "Add Plug-ins" button. Navigate to the directory where you put "HD_Caustics.p" and select it. A message should appear that says "2 plug-ins have been successfully added." Exit Lightwave to save these changes.
LightWave 6.5 users: Copy the file "HD_Caustics.p" from the "hd_cowstics6" directory into your Lightwave/Programs/Plugins/Texture directory.
Now, fire up Layout. Open the Layout->Plug-ins->Add_Plug-ins panel and add the "HD_Caustics.p" plug-in. A message should appear that says "2 plug-ins have been successfully added." Exit Lightwave to save these changes.
note - The LW 5.6 version and the LW 6.5 version of HD Caustics are NOT compatible with each other, so objects made with one will not work with the other. You will have to re-apply HD Caustics to any objects you transfer from one version of LightWave to another.
Voilŕ!
Before you learn how to use HD Caustics, you need to know how to properly model refractive objects in Lightwave. Read on!
Refraction in Lightwave - To make realistic refractive objects, you have to understand how Lightwave handles refraction. As a light ray bounces around in your scene, Lightwave keeps track of the refractive index of the medium that the ray is currently in. The ray starts out in air, with a refractive index of 1. Every time it hits a transparent polygon, it is bent according to the ratio of the current index to the new index by Snell's Law. The current index is set to the new index and the ray keeps going.
Refraction in "Real Life" - Now let's think about what happens in "real life". A light ray starts out in air (index = 1) and hits, say, a glass ball (index = 1.52). This bends the ray. Then it travels through the glass to the other side, back out into air (index = 1). This bends the ray again. So, to simulate this in Lightwave, a light ray needs to hit polygons going in (glass) and polygons going out (air). In other words, we need glass polygons facing out, and air polygons facing in.
| We need glass polygons facing out, and air polygons facing in. |
Building the Thing - Fire up Modeler and build yourself a simple object. Make a bowl or a sphere or something. Apply a surface to it called "Glass". Make sure that you make a nice, solid, 3D object with no holes or self-intersections. Otherwise, the raytracer can get confused. Remember, the object is going to be transparent, so any garbage polygons on the inside of the object will be visible!
| Make sure that you make a nice, solid, 3D object. |

| Tripling the polygons avoids nasty raytracing artifacts. |
There. We have the Glass polys. Now we need the Air polys. Luckily, this is simple. Copy your object onto another layer. Flip the polygons, and apply a surface called "Air". Now cut and paste this layer back onto the original layer. Merge points. Every air polygon must share its points with the opposing glass polygon, or there may be some raytracing artifacts. Merging points accomplishes this.

| Every air polygon must share its points with the opposing glass polygon. |
Surfacing the Thing - Here's a typical glass surface and air surface, correctly set up for Lightwave:
| Glass Surface: | Air Surface: |
|
|
Note that the Air surface needs to be exactly the same shape as the Glass, including the Smoothing setting and any bump maps. And, since the Air is flipped, its bump maps should have negative amplitudes compared to the Glass bump maps. Perfectly matching the shape of each transparent surface may require more than one Air surface. However, you can often get away with ignoring the bump maps, and just having one Air surface with Smoothing turned on called "AirSmooth", and one with Smoothing turned off called "AirFlat". Keep this in mind when modelling!
| Perfectly matching the shape of each transparent surface may require more than one Air surface. |
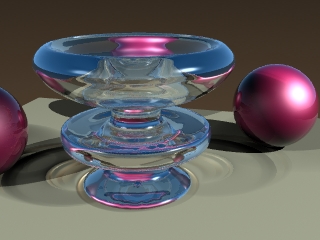
Render the Thing - Load your model into Layout and set up the surfaces to match the above table. Also load up some props so your object has something to refract. Just grab a bunch of stuff from the Objects directory and set up a happy still life. A few apples, a baseball cap and a pair of sunglasses sitting on a table should complement your object nicely. Put a nice gradient in the background. Add some nice lights. Turn on Trace Shadows, Trace Reflections and Trace Refractions. Then WHAM! Hit Render.
| Load up some props so your object has something to refract. |
Ooh, Pretty Shadows! - So far we've only used the tools that are built right into Lightwave. It's time to add some real nice shadows using HD Caustics! Go to the Surfaces panel in Layout and select the Glass surface. Turn the Color Filter on. This is very important. HD Caustics alters the color and transparency of the surface in order to simulate the shadow effects. Without the Color Filter, you won't see the effect!
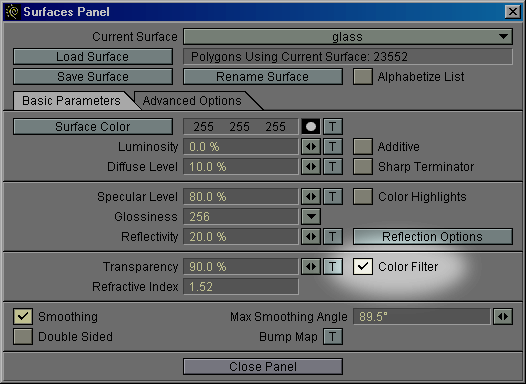
| Turn the Color Filter on. This is very important. |
Now, add the HD Caustics Shader Plug-in to the Glass surface.
LightWave 5.6 users: Click the Advanced Options tab. There should be a bunch of long pop-up buttons in an area labeled Shader Plug-ins. Click down on one of the pop-up buttons and you should get a list of available plug-ins. Select HD_Cowstic. If HD_Cowstic does not appear in this list, make your you've installed it correctly.
LightWave 6.5 users: Under the Shaders tab, use the Add Shader pop-up to add HD_Cowstic. If HD_Cowstic does not appear in this list, make sure you've installed it correctly.

| Add the HD_Cowstic Shader Plug-in to the Glass surface. |
 |
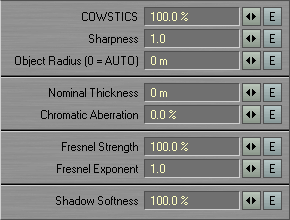 |
HD Caustics Options Menu
LightWave 5.6 users: Click on the Options button beside the pop-up button where you selected HD_Cowstic.
LightWave 6.5 users: Double-click on the HD_Cowstic entry in the Shaders list.
This brings up the HD Caustics options menu. You should see a lot of big, multisyllabic words. Don't worry. Here's what they mean in a nutshell:
Cowstics Options
COWSTIC stands for Caustics, Only With Some Terribly Inaccurate Cases. These are fast, fake caustics. Fake. They make the shadows of transparent objects look pretty, based on a number of factors including the index of refraction.
COWSTICS - This controls the strength of the cowstics. Set it to 0% if you don't want cowstics. The default value is 100%.
Sharpness - This controls the sharpness of the cowstics. Sharper cowstics are smaller and brighter. The default value is 1.0.
Object Radius - If the cowstics don't quite look right, you can try fiddling with the Object Radius parameter. Setting it to zero tells HD Caustics to measure the radius of the object for each point that's rendered. If you know the radius already, and it doesn't change much throughout the object, type it in to save some render time. The default value is 0.0 (AUTO).
Coloration Options
Nominal Thickness - This controls how quickly the object turns opaque as it gets thicker. This affects the shadows and the actual object. Smaller values turn opaque faster than larger values. To be exact, this is the thickness at which the color and transparency of the object will be equal to the settings in the Surface Editor. Usually, you can just use roughly the average thickness of the object. Or, you can try setting it to 0.0, which tells HD Caustics to ignore the thickness of the object, and to fake the thickness effect. This saves render time, though it may not be as pretty. The default value is 0.0 (FAKE IT).
Chromatic Aberration - This controls the strength of the chromatic aberration effect. Chromatic aberration causes the color of the cowstics to depend on the index of refraction. This roughly approximates the separation of light into different wavelengths. The default value is 0%, though 100% often looks good.
Fresnel Options
Fresnel Strength - This controls the strength of the Fresnel effects. Set it to 0% if you don't want Fresnel effects. The default value is 100%, since most real transparent surfaces exhibit the Fresnel effect.
Fresnel Exponent - This controls how sharply the Fresnel effect applies as the viewing angle approaches glancing. Lower values yield a more gradual effect; higher values push the effect towards the edges. Good results can usually be obtained from values between 0.1 and 2.0. The default value is 1.0.
hint - For greatest realism, leave Fresnel Strength at 100% and adjust the Fresnel Exponent to adjust the fresnel effect instead.
Shadow Options
Shadow Softness - This tells HD Caustics how soft you want the edges of the shadows to be. For maximum realism, it should be set to 0%. However, the default value is 100% because it looks so much prettier.
Envelopes
The LightWave 6.5 version of HD Caustics has envelopes for every single parameter. Just click on the E beside the parameter you want to add an envelope to. You can also shift-click the E to remove the envelope. Sweet.
|
 |
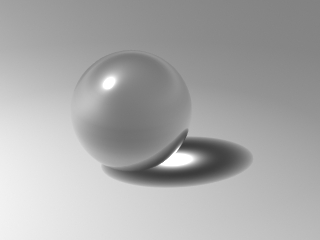
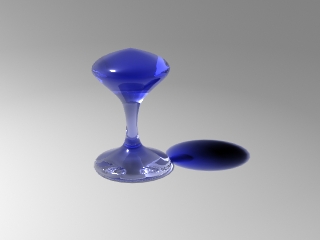
Here are some example images showing a glass ball with various HD Caustics settings. Use these as a starting point for getting the look you want for your object. Then, play with the settings as much as you want to get a feel for what is possible with HD Caustics!
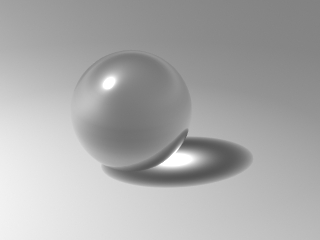 Default HD Caustics settings. |
 Cowstics Sharpness reduced to 0.5. |
 Cowstics Sharpness increased to 2. |
|
 Cowstics reduced to 50%. |
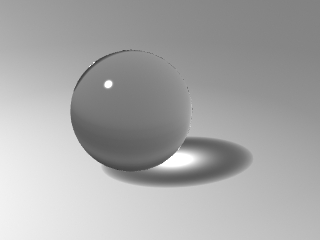 Fresnel Strength reduced to 0%. |
 Fresnel Exponent increased to 2. |
|
 Chromatic Aberration increased to 100%. |
 Shadow Softness reduced to 0%. |
 Shadow Softness reduced to 50%. |
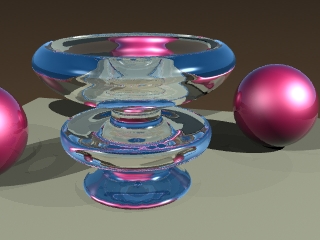
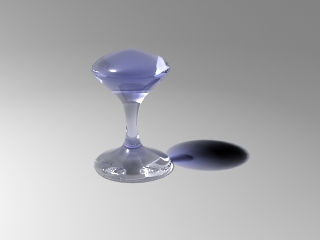
Next we have some example images using a glass object that kind of looks like a chess pawn. This images exhibit the thickness-based transparency settings. Notice how the "neck" of the pawn is more transparent because it is thinner. The transparency is computed from the thickness using a physically based model. Cool!
The pawn is 2 meters high and the color is set to 64% R 66% G 99% B. The Nominal Thickness is the thickness at which the color is set to the color you entered in the Surface panel. So, a bigger nominal thickness will make the object more transparent, and a smaller nominal thickness makes it less transparent.
 Nominal Thickness set to 0 (FAKE IT). |
 Nominal Thickness set to 200mm. |
 Nominal Thickness set to 100mm. |
 Nominal Thickness set to 25mm. |
If the caustics are not quite satisfactory, as in this case, you can play with the Object Radius parameter to try and fake better looking caustics. You can also play with the Cowstics strength to get better results. These next images are rendered with Nominal Thickness set to 25mm.
 Object Radius set to 100mm. |
 Cowstics set to 0%. |
Known Limitations:
Send any comments or bug reports via E-Mail:
graham@happy-digital.com
If you wish to receive the Happy Digital newsletter, which has information on new products
and new versions / upgrades of existing products, send a blank e-mail to the following address:
happydigital-subscribe@egroups.com
You can also visit Happy Digital's web page for news and product information:
www.happy-digital.com