back to freebies page

Enhancing Transparent Stuff with GThick2

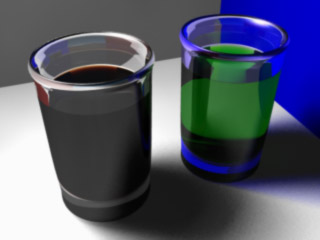
Here's how to make super-realistic transparent stuff by measuring the real thing and simulating it with GThick2.

Pick something transparent you want to simulate. Preferably, choose something you can examine in different thicknesses, but that's not really necessary. I'll choose ginger ail for this tutorial.


You'll need:
  • a flashlight or lamp
  • a piece of waxed paper or light diffusion material
  • scotch tape
  • a clear glass
  • some ginger ail
  • a ruler
  • your computer
  • your eyeballs or similar colorimeter
  • a pencil and paper (or Notepad)

Step 1 - tape a piece of waxed paper on the flashlight to act as a diffuser, so when you turn on the light and look at it, it's more or less a uniform circle of color.

Step 2 - Place the flashlight light-side up, and hold the glass over it. Look into the glass from above and you'll see a color. Using LightWave or Photoshop, match this color on your monitor and write it down with the label "white".
I got 250 R 200 G 180 B.


Step 3 - Pour some ginger ail into the glass. Pour enough so that it looks kind of dark when viewed from above over the light, but not too dark. Go for an average medium kind of color.
NOTE: Things like food coloring would require much less to look dark.


too light

good

too dark

Step 4 - Using the ruler, measure the height of the ginger ail. Write down this height. Now, using your computer, match the color you observe from above the glass. Write this color down beside the height.
I got 9.5 cm and 200 R 80 G 20 B.

Step 5 - If you're not squeamish about math, you can take more measurements and different heights to get a more accurate sample. I'll write about this in a later tutorial.


Step 6 - Divide "true white" (255 R 255 G 255 B) by the "white" you measured, and multiply the result by the ginger ail color you measured, to get the true color of the ginger ail.
In other words, you get:
255/250*200 R 255/200*80 G 255/180*20 B
or 204 R 102 G 28 B.
Write this down. This is the color you'll be using for the surface in Lightwave.


Step 7 - Build your object. I'll use a simple blobby thing. Name the surface "AirToGingerAil".


Step 8 - Copy the object, go to another layer, and paste. Hit F to flip the polys. Apply a new surface called "GingerAilToAir".

Step 9 - Put both objects on the same layer and merge points. Save it as one object.

Step 10 - Load the object into Layout and go to the Surfaces panel.
For AirToGingerAil, use 100% transparency, 80% specularity, 15% reflectivity, and 1.33 Refractive index.
For GingerAilToAir, use 100% transparency, 0% specularity, 0% reflectivity, and 1.00 Refractive index. Set the color to whatever you calculated in step 6 (205 R 102 G 28 B) in this case. Turn the color filter ON, or this won't work at all. Oh, and use smoothing on both since the object is round.

Step 11 - On the GingerAilToAir surface, activate the Advanced Options panel. Choose LS/Procedural-RT as the plug-in. Under Options, choose GThick2.lsc. Then, under options, you will be asked for a Transparency Unit. Type in the height you measured in step 4. In this case it's 9.5 cm. Make sure to include the units!

Step 12 - In the render panel, turn on Trace Reflection, Trace Refraction, and Trace Shadows. Load up an office or something in the background and hit render.


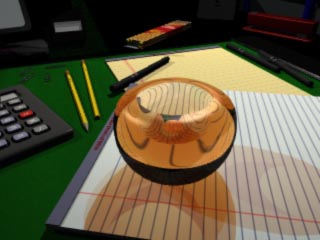
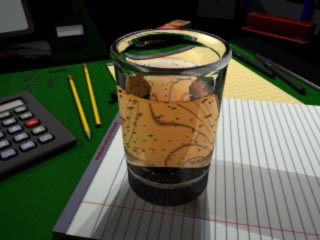
There you have it. Of course, a blob of ginger ail sitting on a desk isn't the usual sort of thing that a client will ask for, so I'll do another tutorial on how to have multiple transparent surfaces touch each other, and then you can have a glass around your ginger ail. Also, I'll include how to do semi-opaque materials, such as apple cider and milk. - GLYPH

Go to the GThick2 page.