Gamma Correction with GammaRight
|
What's the deal with LightWave and gamma correction? Right. First of all, you might want to read up on what exactly gamma correction is, and how to make sure your monitor is correctly corrected. There's a good treatment of that here. Once you're familiar with gamma correction, you should know that the RGB value you spit out to your graphics card is not linearly proportional to the number of photons your monitor spits out to your eye. So if you double the RGB values, the number of photons actually more than doubles. So what? Well, that's fine if you're displaying an image that was created with the assumption that it would be viewed on a monitor like yours. Most images on the internet, for example, are gamma corrected for the average PC monitor. But in LightWave, we're generating synthetic images. Specifically, LightWave is simulating how many photons get to each pixel of a virtual CCD camera. (It's not directly simulating photons, but the result is the same) Okay... LightWave is simulating photons... So what? The problem is, when LightWave gives us its output in the form of an image, the RGB value of each pixel is proportional to the number of photons that got to that pixel. This is called linear gamma. But your monitor isn't calibrated for linear gamma. It uses a gamma probably around 2 or 3. | |
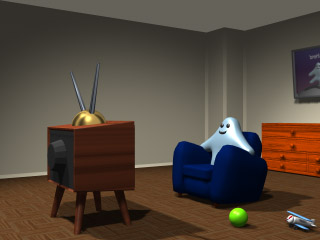 |
Here we have the familiar TV Guy demo that comes with LightWave 5.6. LightWave has gone through lots of trouble to simulate how many photons get to each pixel, but we're displaying the linear gamma result on a monitor with nonlinear gamma. So the number of photons that get to our eyes is not proportional to the number of virtual photons that got to LightWave's virtual camera. We need to gamma correct the image for display on a PC monitor. |
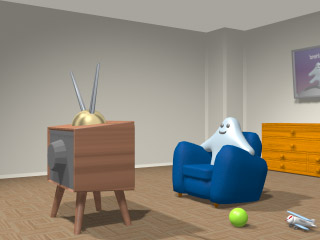 |
Here we have the TV Guy with gamma correction using the LW_GAMMA image filter plugin. This plugin converts LightWave's linear gamma output to a gamma of 2.2, which is closer to your monitor's gamma. So the number of photons that get to your eye from each pixel is closer to the simulated values. This results in a more realistically shaded image. |
|
Oh, yuck. That's way too bright and washed out. Right. The image is washed out because of an interesting phenomenon where two problems almost cancel each other out. When a LightWave artist chooses the colors for his surfaces, he uses a color picker that is displayed with a gamma of about 2.2, matching his monitor. However, LightWave takes the surface color quite literally in terms of the number of photons that bounce off the surface, meaning linear gamma. So if the artist doubles the number of photons that reach his eye from the color picker, he less than doubles the number of photons that LightWave will bounce off the surface. So? What's this about two problems cancelling? Okay, that was one problem. The second problem was actually already mentioned: LightWave displays its linear output on your non-linear monitor. So the net result is this: The artist chooses colors using a display with a gamma of 2.2. Then, LightWave uses those colors thinking they have linear gamma and performs the simulation. Last, LightWave displays the linear gamma simluation results on a monitor with a gamma of 2.2.These two problems almost cancel each other out, but only with respect to the overall color of the surfaces. The subtleties of the shading and lighting falloff are quite wrong. So the overall number of photons that get to your eye from a surface in LightWave's final output will be similar to the number of photons that get to your eye from the color picker, but the shading is wrong. This is why it looks too bright when we correct the gamma with LW_GAMMA. So you might be inclined to not use LW_GAMMA, but then there will be errors in the rest of the simulation because the gamma was not corrected at the right stage of simulation. What we really need to do is gamma correct the colors we choose from the color picker so they'll have the proper linear gamma that LightWave needs. This is exactly what the GammaRight Shader plugin does, so you don't need to worry about the conversion yourself. Just pick the colors and apply the shader. | |
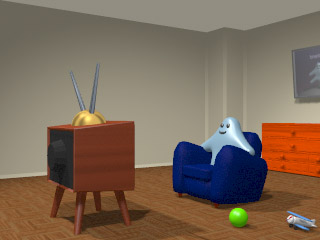 |
Here we have the TV Guy with the GammaRight shader applied to all the surfaces, and the GammaRight image filter applied to the result. The GammaRight image filter is similar to the LW_GAMMA filter. The shading and lighting falloffs in this image should look more realistic than the original, because the number of photons reaching your eye from each pixel is finally proportional to the number of photons that LightWave thinks should get there, and that the surface color suggests. |
|
Hmm... Well, it's not washed out anymore, but it's still too bright. Right. This is exactly the same problem as the color picker problem, but this time it's the ambient light intensity that's wrong. A LightWave artist usually choses the ambient light intensity by making preview renders on his non-linear gamma monitor, once again causing a problem that almost cancels out. We need to gamma correct the ambient light intensity. There is a simple formula for this: Corrected intensity = 100% * (uncorrected intensity / 100%) ^ 2.2 Of course, if you're creating a new scene, you wouldn't use this formula. You'd choose your ambient light by looking at preview renders with the gamma correction plugin already applied. | |
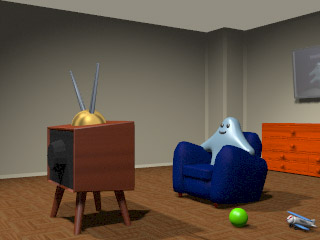 Corrected |
Uncorrected |
|
On the left we have the TV Guy demo with all of the gamma corrections mentioned so far. On the right is the uncorrected version. The major differences should be in the shading, which should look much more realistic in the corrected version. A similar problem can happen if you're using a backdrop color or a backdrop gradient, colored lights, or even the fog color. Since you choose those colors from a color picker, they won't be corrected. The correction formula for RGB colors is as follows: Corrected R = 255 * (uncorrected R / 255) ^ 2.2 Hey, does gamma correction have anything to do with the way some of my image maps look too dark in LightWave? It sure does. You might notice that some image types look dark when loaded into LightWave. Take PNG images, for example. When LightWave's PNG loader loads an image map, it assumes that the image was created on a display device with a gamma of 2.2, so it converts the image to linear gamma. That's why it looks darker. This can be confusing because LightWave converts some images but doesn't convert colors you choose from the color picker. So while you should apply the GammaRight shader if you chose your colors from the color picker, you should not apply it if the colors come from an image map that's already been corrected, like PNG. I believe this is a perculiarity of the PNG loader, since most other loaders do not perform the adjustment. So, the moral of the story is if you use the tips presented here, your image maps won't be too dark in your renders, and your lighting will look more realistic. Happy gamma correcting! - GLYPH | |