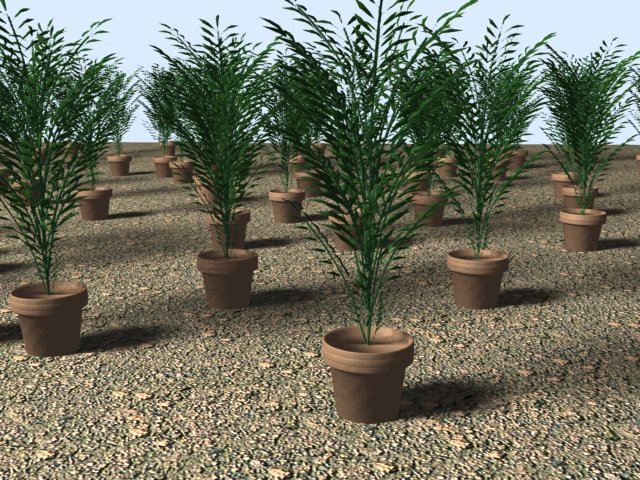
 Only one of these potted plants is rendered by LightWave. The rest are instances rendered by HD Instance. |
| Introduction | - What is it? |
| Installation | - Where do I put it? |
| Usage | - How do I use it? |
| Common Issues | - What am I doing wrong? |
| Limitations | - What can't it do? |
| Known Bugs | - What's wrong with it? |
| Contact Happy Digital | - Where do I complain? |
HD Instance is a plug-in for LightWave 7.5 and up that lets you render thousands of object instances (clones) without using up lots of memory! You can place the instances using null objects, including scaling and rotation, and each null can be a clone of any ordinary object in the scene. You can also place instances on the points of any object, with randomized scaling and rotation options. The instances follow the original object exactly including all animation, plus they have their own scaling and rotation applied on top.
HD Instance is a true volumetric plug-in, so it shows up in ray-traced shadows, reflections, and refractions. The instances rendered by HD Instance look just like any other LightWave object, including procedural textures, gradients, UV textures, reflections, refraction, shadows, etc. (minus a few limitations; see Limitations)
Only one of these potted plants is rendered by LightWave. The rest are instances rendered by HD Instance. |
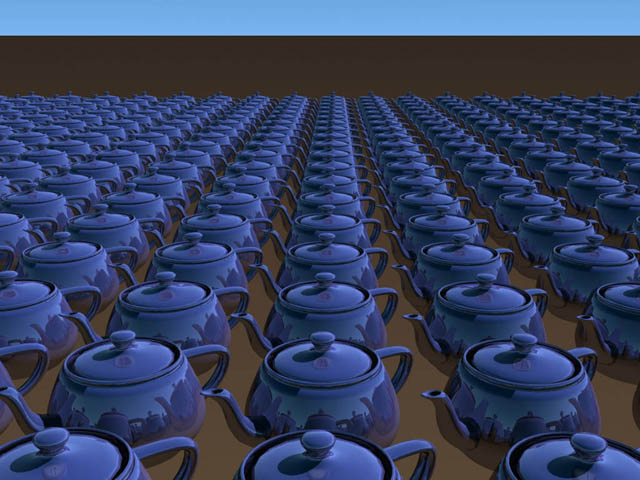 Here are some nice high-poly teapots. Note the full ray traced reflections and shadows. |
Copy the file "HD_Instance170.p" from the "hd_instance" directory into your Lightwave/Programs/Plugins/Effect directory.
Now, fire up Layout. Open the Layout->Plug-ins->Add_Plug-ins panel and add the "HD_Instance170.p" plug-in. A menu should appear that says "6 plug-ins have been found and successfully added." Exit Layout to save these changes.
Voila!
HD Instance uses two plug-ins: a Custom Object plug-in for setting up the instances and a Volumetric plug-in for rendering them. There are also two optional plug-ins: a Pixel Filter that allows compatability with certain popular Pixel Filter based plug-ins, and a Shader that lets you randomly tint the colors of the instances. First we'll apply the volumetric plug-in, then we'll set up the instances.
Applying the Volumetric Plug-in
We need to apply the HD Instance volumetric plug-in or we won't see our instances. Go to the Scene->Volumetrics panel, and add the plug-in using the "Add Volumetric" pop-up. Now we're ready to make some instances!
How to Place Instances in a Scene
First you need an object or a heirarchy of objects that you want to clone. We'll use the MechWalk example in the Robots folder that comes with LightWave. You can use whatever objects you want, though. You can animate the object so it looks like its walking if you like. Let's also make a ground plane with a nice surface so we can see shadows. You can put in some fog and such to make it look cool, too.
 The MechWalk scene with some fog and a nice camera angle. |
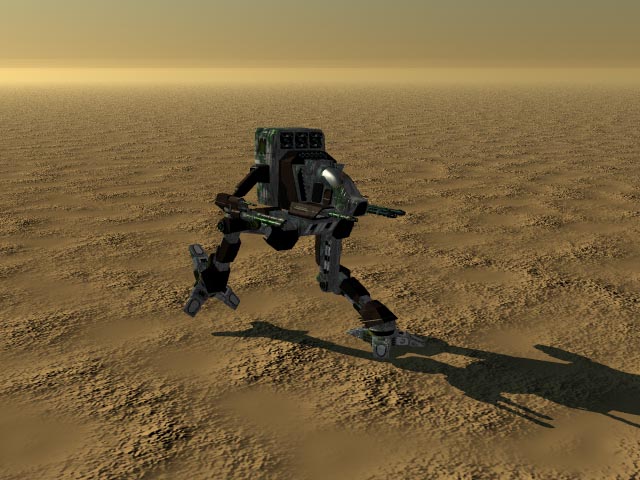 Here's a LightWave render of the mech. |
 The HD Instance Custom Object interface in LW 7.5 |
HD Instance Options
The HD Instance Custom Object plug-in is the plug-in that tells HD Instance which objects will be used for instance placement. We'll get to the actual placement later. Right now let's look at the options. Here's what the options mean in a nutshell:
Emitter Type - The Emitter Type determines how and where HD Instance will place the clones. Selecting Points tells HD Instance to place one clone at each point. Selecting Polygons tells HD Instance to place a clone at the center of each polygon, aligned to the polygon normal. The default is Points. If the base object is a null object, the emitter type is ignored and one clone is placed at the null object. [TIP] The Polygons option is great for sticking things to objects, like hair or spikes or rocks.
Preview Type - The Preview Type determines how HD Instance shows the instances in Layout. Selecting None results in no preview of the instances. Selecting Axes shows the coordinate axes for each instance. The X, Y and Z axes are drawn as Red, Green and Blue lines, respectively. Selecting Bounding Box shows a nice bounding box for each instance. The default is None.
Add Object - This button lets you add an object to clone. The plug-in starts with one object already. If you want to have more than one object cloned randomly over your base object, then this is the button you want to click.
Remove Object - This button lets you remove an object to clone. It removes the currently selected object to clone. There is currently no undo for this button, so take a little care.
Edit Object - This button selects the object whose clone settings you want to edit. The object names are numbered as well, for your convenience.
Object to Clone - This tells HD Instance which object will be cloned. The selected object shows up in the Edit Object pop-up as well, for your convenience. [TIP] If you don't want the original object to be visible, i.e. you only want the clones visible, you can go to the Render tab in its Object Properties panel, turn on "Unseen by Rays" and "Unseen by Camera", and turn off "Cast Shadow". This is just the standard way to make objects invisible in LightWave.
Density - This value tells HD Instance what percentage of the points or polygons will be used to place clones. For example, 100% will result in a clone on each point or polygon, and 0% will result in no clones at all. You can use this to place random flowers over a field, for instance, or rocks over a landscape. If you have more than one object cloned, their distributions will be mixed weighted by their densities.
Density Map - This allows you to modulate the density by a vertex map. You can literally paint a vertex map showing where your instances should go. Very handy!
Apply Transform - The Apply Transform setting determines how HD Instance alters the transform of the base object. Selecting After Base Transform tells HD Instance to apply the randomized transform onto the base transform. Selecting Before Base Transform tells HD Instance to apply the base transform onto the randomized transform. Selecting Replace Base Transform tells HD Instance to replace the base transform with the randomized transform. The default is After Base Transform.
Rotation - The Rotation setting determines how HD Instance will rotate each clone. Selecting Random tells HD Instance to apply random rotation. Selecting Particle Direction when using a partigon emitter tells HD Instance to align the instances to the velocity of the particles. Selecting Point At tells HD Instance to point each instance towards a target item. For example, you can point the instances at the camera to get nice billboards. Selecting Point At (Heading) tells HD Instance to point each instance towards a target item, but only adjusting the heading. This is useful for billboards that shouldn't be pitched, like trees. It's also useful for objects that logically only adjust heading, like cars or something. Selecting Point Downhill tells HD Instance to point each instance downhill, which makes the most sense in Polygon mode. This is the most similar mode to the old way HD Instance placed instances in polygon mode prior to version 1.6. The default rotation mode is Random. All other modes also have optional randomness applied over top.
Edit Rotation Settings - This button pops up a panel that lets you edit the settings for the rotation setting. The settings follow:
Minimum Rotation / Maximum Rotation - These values tell HD Instance what range of rotation angles should be used. Each instance will be rotated a random amount that lies somewhere in this range. So if you want no randomness, set the minimum and the maximum to equal values. Or, for example, if you want the full range for H, set the minimum H to 0 and the maximum H to 360. The rotation of each instance will be random, but consistent. That means you can use HD instance in your animations and the instances won't jump all over the place.
Orientation - This setting tells HD Instance how to apply the rotation. Fixed tells HD Instance to use the angle directly. Spinning (per frame) tells HD Instance to spin the instances, using the angle as an angular velocity.
Target Item - If you have selected the Point At or Point At (Heading) rotation modes, this pop-up list allows you to select which item in the scene the instances will point at.
Scaling - The Scaling setting determines how HD Instance will scale each clone. Selecting Random Scale tells HD Instance to apply random scale, with different scaling on the X, Y and Z axes. Selecting Random Size tells HD Instance to apply random size, meaning the same scaling is applied to the X, Y and Z axes. The default is Random Scale.
Edit Scaling Settings - This button pops up a panel that lets you edit the settings for the rotation setting.
Minimum Scale / Maximum Scale / Minimum Size / Maximum Size - These values tell HD Instance what range of scales should be used. These work similarly to the rotation options.
Weight Map - This allows you to modulate the scaling by a vertex map.
About HD Instance - This shows some information about HD Instance, including the version that is installed.
Now that we've seen the options, let's place some instances. There are two ways to do this. First, we can place instances one-by-one with complete control by using null objects. Second, we can place instances in bulk with random rotation and scaling options by using the points of an object. Let's look at these two in more detail.
Placing Instances Using Null Objects
This is so easy it's not funny. Simply add a null object to the scene. Then add the HD Instance Custom Object plug-in and choose your Object to Clone. Now you can move it, scale it, rotate it and animate it however you want. HD Instance will render a clone right on top of it! Here we'll use the "Control" object, since that's the parent of all the other pieces of the mech. HD Instance will clone the object and all its children.
 We've added a null object (called "instance") and attached the HD Instance Custom Object plug-in. The null has been moved and rotated. |
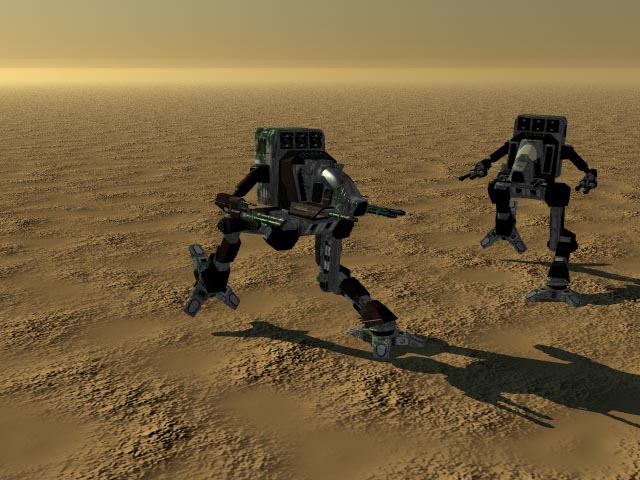 Here LightWave has rendered one mech, and HD Instance has rendered the second mech. The second mech follows the animation of the first mech, plus the animation of the null. |
Placing Instances Using the Points of an Object
Now let's place a whole bunch of instances using the points of an object. Go into modeler and spray some points. Then scale them up so they're reasonably far apart, considering the size of the mech. For this scene we'll scale the Y dimension to 0 so all the points lie on the ground. For extra niceness, we'll Merge Points with a fixed range (5m) to eliminate any points too close to each other.
 We've created a nice field of points using Spray Points, then scaled the Y dimension to 0. Merge Points was used with a fixed range to eliminate points too close to each other. |
Now go back to Layout and attach the HD Instance Custom Object plug-in to the points object. [TIP] To see where the points are in Layout, go to the Scene Editor panel and set the display mode for the points object to "Vertices".
 Here's the "points" object with the HD Instance Custom Object plug-in attached. We've set the display mode to "Vertices" so we can see the points. |
This is too easy. Just choose the Object to Clone in the HD Instance Custom Object panel, and render away! You can also play with the randomization options for some fun variations.
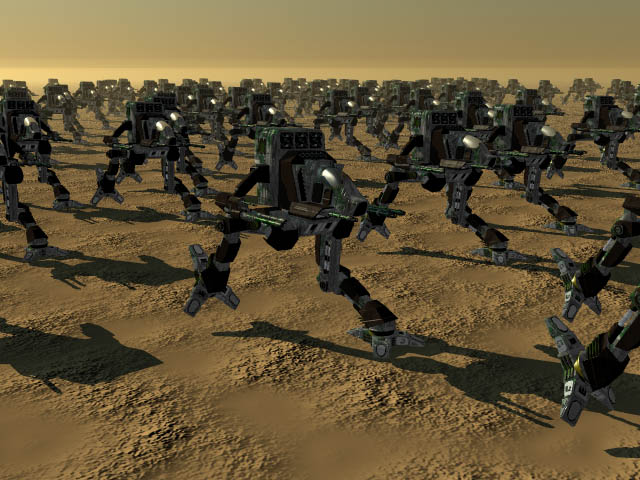 Here LightWave has again rendered one mech, and HD Instance has rendered many mechs! |
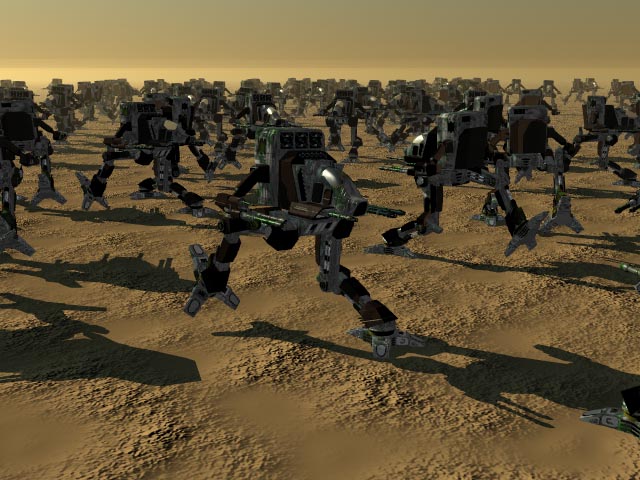 Here's what happens when we set the Maximum Rotation H to 360 degrees. |
Placing Instances Using Partigons
Partigon placement works exactly the same as point placement, except that you must place the HD Instance custom object plug-in after the FX Emitter custom object plug-in, and the object must be a Partigon object. Using FX Emitter on a null object will not work with HD Instance. It has to be a Partigon.
 HD Instance applied to partigons. Awesome! |
 Aaah! Bees! |
Tinting the Instances with Random Colors
HD Instance lets you add random coloration to the instances' surfaces. To randomize a surface's color, add the HD Instance Shader plug-in to the surface. Opening the shader's panel reveals a color gradient. Each instance randomly selects a color from this gradient, and tints (multiplies) the surface color with it. Any color on the gradient may show up on an instance. This is nice if you want to make some flowers that range in color from yellows to oranges to reds, for instance. If you only want a certain set of colors, you can make parts of the gradient a single solid color by putting the same color on both ends of the range. This is easy to do by copying and moving the gradient's keyframes.
The Gradient Editor works as follows:
The gradient is defined using keyframes. Each keyframe is represented by a keyframe gadget, consisting of a drag gadget (the little diamond on the top) and a color gadget (the little box on the bottom). There is always a keyframe at either end of the gradient.
To select a keyframe, click on the middle of its gadget, that is, somewhere between its drag and color gadgets. Click there again to deselect the keyframe. The currently selected keyframe will display its parameter value (from 0 to 100) in the middle of its gadget. The above diagram shows a selected keyframe with a parameter of 67.
To create a keyframe, click anywhere on the gradient where there currently is no keyframe. This creates a new keyframe at that location.
To delete a keyframe, shift-click its drag gadget.
To drag a keyframe, click-and-drag its drag gadget. Note that you can drag a keyframe right up to another one, such that they occupy the same parameter value. This lets you create sharp changes in the gradient. You can still drag the keyframe later to another position.
To edit a keyframe's color, click its color gadget to bring up a color dialog.
To copy a keyframe to a new keyfame, first select the keyframe. Then, shift-click the gradient where you want the new keyframe.
To copy a keyframe to an existing keyfame, first select the keyframe. Then, shift-click the color gadget of the keyframe that you want to copy to.
This concludes the documentation of the Happy Digital Gradient Editor.
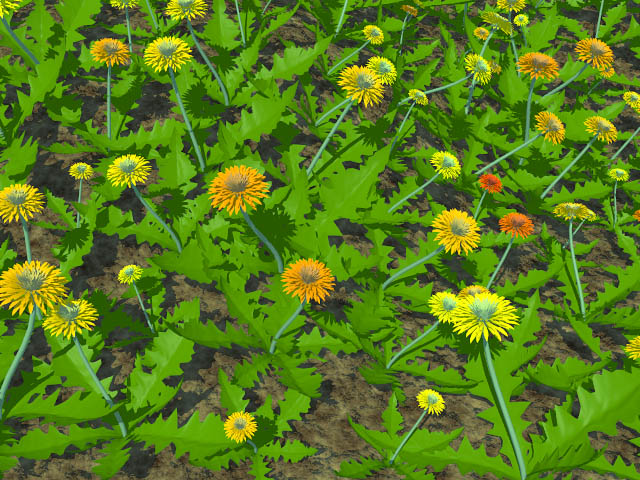 Here we have some yellow flowers, tinted (multiplied) by a gradient from white to red. Yay! |
Getting HD Instance to Work with Pixel Filters
There are quite a few popular pixel filter plug-ins that render objects or fur or whatnot, and none of them work very well with volumetric plug-ins like HD Instance. To get around this problem, simply add the HD Instance Pixel Filter plug-in before the other pixel filter plug-ins. Do not remove the volumetric plug-in! Just add the pixel filter. Note that HD Instance does not work with some other pixel filters if multiple threads are used. The work-around is to use only one thread. This will be fixed in a future version.
Now go and play! Make a scene with a whole bunch of HD Instance trees and bushes, and a stampede of animated rainbow-colored HD Instance bunny rabbits or something. Or do something industrial or architectural, with thousands of really fancy 70-thousand-polygon pillars or ornaments or whatnot. Or whatever happens to come to mind. Go play! Right now!
My instances are not rendering at all!
Make sure you have the HD Instance volumetric applied to the scene.
The polygons in the instances seem to have some small gaps between some of them.
You might have some non-planar polygons in your model. Try converting the polygons to triangles using the Triple tool in Modeler. This happens because HD Instance is a ray tracer instead of a scan-line renderer. The same kind of artifacts occur in reflections or refractions in LightWave.
HD Instance has a few limitations:
Shader plug-ins applied to surfaces will not be rendered by HD Instance. This unfortunately affects compatability with some popular plugins. However, the good news is that plug-ins applied to surfaces of objects that are not instances should work fine, since HD Instance is a true volumetric plug-in.
HD Instance, like all volumetric plug-ins, does not show up in shadow-mapped shadows. This is rather unfortunate, but it may be fixed in a future version. However, instances can still receive shadow-mapped shadows from ordinary objects. They just can't cast their own shadow-mapped shadows.
HD Instance does not render as fast as LightWave's native render engine. NewTek has put many years of hard work into their ray tracer, and quite frankly it's about 2 to 4 times faster than HD Instance's ray tracer. This means that if you only have a few clones, or even a few dozen clones if the objects are simple, then it may be better to just use LightWave. However, if your objects are very complex or if you want hundreds or thousands or hundreds of thousands of clones, then HD Instance is the only way to render them. That's because HD Instance doesn't use extra memory to store all the clones. You can literally render scenes with trillions of instanced polygons using HD Instance. Don't be afraid to try!
Bugs that will be fixed in a future version:
When using the pixel filter, the alpha channel of instances is set to match the transparency of the instance, regardless of whether you can see opaque things through it.
HD Instance does not work with some other pixel filters if multiple threads are used. The work-around is to use only one thread.
Smoothing on polygons with holes doesn't smooth around the holes.
Refraction in instances looks a little different than native LW refraction.
Bugs that cannot be fixed due to limitations in the LightWave SDK:
If you use HD Instance and Hypervoxels together, the Hypervoxels volumetric plug-in must be first in the list, and HD Instance second.
If you change the order of the objects in the scene editor (or by other means), HD Instance may render the incorrect object. The work-around is to save your scene, and then reload it.
Instances do not receive the Glow effect.
Instances do not show up in Shadow Mapped shadows.
Instances do not affect volumetric lights.
Instances do not receive Shading Noise Reduction.
Instances do not properly affect Backdrop Only radiosity.
Setting a subpatched object to subpatch level 0 causes it to not render.
Area light shadows, linear light shadows, and colored shadows do not respect the Global Light Intensity setting.
When using the volumetric, the alpha channel of instances is always 100%.
When using the pixel filter, and Raytrace Transparency is on, the alpha should be 100% but it is unchanged.
Send any comments, feature requests or bug reports via E-Mail:
graham@happy-digital.com
If you wish to receive the Happy Digital newsletter, which has information on new products
and new versions / upgrades of existing products, send a blank e-mail to the following address:
happydigital-subscribe@egroups.com
You can also visit Happy Digital's web page for news and product information:
www.happy-digital.com